Tuesday, October 27, 2015

Shed 2.0


Posted by
Labels:
After our move, we immediately needed more storage space, mainly for yard tools and supplies.  Our mower, tiller, atv, and other yard tools were all sharing floor space with my shop, which left me with little room to work.  I decided to build a shed over an existing concrete slab on our property.  The slab was old and not level so I designed the shed as a pole structure around the slab.  That way the shed didn't actually connect to the slab in any way, and could be more easily built level.

I set the poles as step 1.


Once the poles were set, I had to establish a level line across all the posts.  I used the simplest possible type of water level for this.  It's just a clear tube on either end of a water hose.


You can see the water level stretching from the far right corner to the far left corner.


 Then I cut notches to create ledges for the headers to sit on.


Here the headers are going up.


Rafters up next...
 
 
Headers around the sides now as well.

 
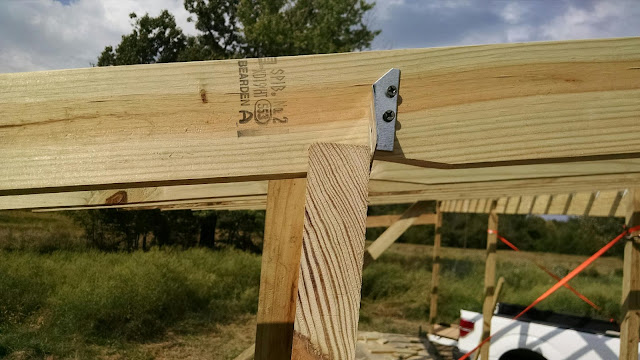
All the rafters are notched to sit on the headers and attached with rafter ties.

 
Next I got some help from my brother and got the metal roof installed.


This slab was constructed in a manner I had not seen before.  A layer of large native stones was first dry-laid into the rough shape of the slab.  Then a 3 or 4 inch layer of concrete, heavy on the aggregate, was poured level over the large stone.  Lastly, a 1 inch or so layer of mortar (with no aggregate) was poured over that and troweled out to create the surface.  The edge of the slab that was going to be the front of my shed was not covered.  I wanted to enclose this in concrete to make it look nicer and strengthen the front edge.


Here I have formed up to pour the concrete.


I put more metal roofing material on the back, and sides of the shed.

 
Here the shed is finished.  You can see the front of the slab turned out pretty good, especially considering my lack of experience.  The red corner trim (also metal building material)  really dresses up the building.  This is a drop in the bucket in the total expense of the building, but really gives it that professional touch.

Friday, July 31, 2015

A Sight for Sore Eyes


Posted by
Labels: ,
There hasn't been a post on this blog for something like 4 months.  Perhaps there's someone out there wondering why.  The answer is that we've been moving.  Between fixing up the old house to sell, and fixing up the new house to move into, there just hasn't been much time for anything else.

As anyone who has moved a shop before will tell you, it is just an absolute disaster.  It's just like moving a house, except if you are moving houses at the same time then everything to do with the shop ends up taking a back seat to getting the house set up.  So the shop just turns into a dumping ground, boxes seem to never get unpacked, you can't start anything because you can't find your hammer or the right box of screws, the whole thing just destroys any initiative to get anything done.  Add to this the heat of an Arkansas summer, and you may never get your shop back going!

But, today I would like to report a success.  I got to the bottom of the pile of stuff on top of and around my workbench!  I am happy to say that tiny slice of the shop, at least, is ready for duty.


And now, here are some shots of the rest of the mess:

We have already spent a fair amount of time putting up shelving to help get stuff off the floor.


Believe it or not I moved this sheet of plywood with all the toolhangers and tools intact.


You may recognize this set of under shelf drawers from a LONG time ago.


The tablesaw top is relatively clear, but lots of the other machines are too bunched up to even use.


You can see there are lots of yard tools in here as well.  We don't have any kind of outbuilding to store that sort of stuff in yet, and boy do we need one!


I will continue to work through setting up the shop.  Look for a real woodworking article in the next month or so.


Sunday, March 22, 2015

Turning


Posted by
Labels:
I have been doing a lot of practice turning pieces on my new lathe.  Here are 3 little end-grain bowls I made out of some douglas fir.
 

 I made this small jewelry box out of the same wood.

  
 I also made this bowl out of poplar.  It's not end-grain, but I'm not sure what the terminology for this type of bowl is.  Maybe you would call it a side-grain bowl?

 
I made a few tool holders for the end of my lathe stand.

 
I turned these two little coat-hook type knobs to hang various things on the lathe stand.

 
I have a long ways to go on improving my lathe skills, but I'm enjoying practicing.  Up next I am going to be building a set of cabinets, and I'll be doing some articles on that process.

Wednesday, February 11, 2015

January: Shop Improvement Month!


Posted by
Labels:

For the second year running, I decided to take January as a kind of shop improvement month.  I typically make a lot of Christmas presents, and January is a good time to clean up the shop, integrate new tools, and complete shop tasks that were put off the previous year.  To start, I integrated a couple of new tools (mentioned in the previous post).  An air compressor:


And a lathe, for which I built a stand.  Then I added these tool holders made of pvc and wood:

I used the new lathe to make some file handles that I had needed for quite some time.  I made these out of some scavenged maple from some old broken chairs I got at a yard sale a year or two ago.  These were the turned pieces from the chairs which weren't reusable for much else.


I built this little dust collector manifold.  Previously I had a 4" drop in this same location with a "Y" to connect my planer and tablesaw.  This manifold is supplied by an upgraded 6" drop and also includes connections for the tablesaw, planer, and jointer as well as a dust sweep which is the large door facing the camera.


Each connection is controlled by an integrated blast gate.


For the blast gates, I made these little wing nuts to lock the doors open or closed.  They consist of a regular hex head bolt with a large wing I made from some scrap steel welded on.

 
I added an outfeed extension and a left hand size extension to my tablesaw.  I have wanted to make an outfeed table extension like this for so long, and just kept putting it off.


And lastly, I made a new table for my sanders to sit on.  The old arrangement in this corner of the shop was such a rigged up mess I won't even attempt to describe it here.  This table is based on Matthias Wandel's simple workbench design.  It is a great way to build a table of nearly any size for your workshop, and I highly recommend it.


I had two barrels stored under the sanders in my old setup.  The space under the new table was just a little too narrow, so I replaced the right barrel, which served as a trashcan, with this quickly knocked together plywood trashcan.


And last but certainly not least, I upgraded my dust collector.  My brother bought my old 1.5hp model, and I upgraded to this 3hp one.  It's pretty tight space wise, but it has certainly been an upgrade performance wise.


 If you enjoyed this article, consider subscribing to our blog.  We have email and rss/atom options at the top right of the page.