Monday, May 27, 2013

Resawing Pear Wood


Posted by
Labels: ,
I got some small logs a while back when my parents cut down an old pear tree in their yard.  I have been meaning to try to resaw them into some usable lumber for a while, but I was afraid to do it with my old bandsaw.  But since I got the new one, I decided to try it out.

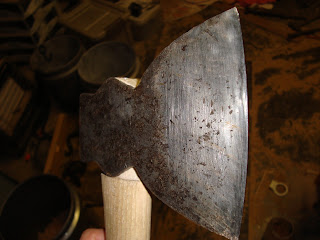
These had been sitting a while, so the bark was mostly loose enough to just pull off.  After that, I used an old broad hatchet to roughly flatten one side of these.  A broad hatchet only has a bevel on one side of the blade, which allows the flat side to ride along the surface of the wood to help maintain a flat cut.  This hatched was one of my salvage finds.


I used the word "roughly" for a reason - this was a learn as you go deal and my "flat" sides were only somewhat flat.


From here, I made a mark down the log with a chalk line and threw them up on the bandsaw.  I used a 1/2" wide 3 tpi blade in the bandsaw and just followed the line as best as I could.  I didn't get pictures from this part.  It was a full time job just manhandling the logs.
These really tested the resaw capacity of the saw, and what I came out with was pretty rough lumber.  I went ahead and cleaned up some of the pieces on the jointer and planer.


Now comes the hardest part - waiting for it to be dry enough to use!


Wednesday, May 22, 2013

Homemade Table Saw Fence System 1


Posted by
Labels: ,
I started working on my new fence system for my table saw last week and thought I would post a progress report. As I said in my previous post, I am using the same basic design that John Heisz used on his home made table saw project. John Heisz Homemade table saw fence


I picked up the materials needed for this project at the local steel yard for around $50. I got 10 feet of 2'' x 2'' steel angle and 10 feet of 2'' x 3'' rectangular steel tubing.


I started by mounting the angle to the saw using existing holes that were used to mount the old fence system. Next I attached a piece of the 2 x 3 tubing to the angle leaving a small gap for the fence to slide. I slotted the mounting holes so the fence rail is adjustable. This will allow me to get the fence perfectly square with the blade on the tablesaw.


Right now I just have a couple of bolts with nuts holding the tubing on. Later I thread the holes so i can just use bolts.


For the fence itself, I started by welding a plate to a small piece of the angle that was then welded to the bottom of the fence. The plate simply acts as a spacer to raise the fence a bit. I took special care to ensure this piece of angle was perfectly square with the fence before welding it in place.


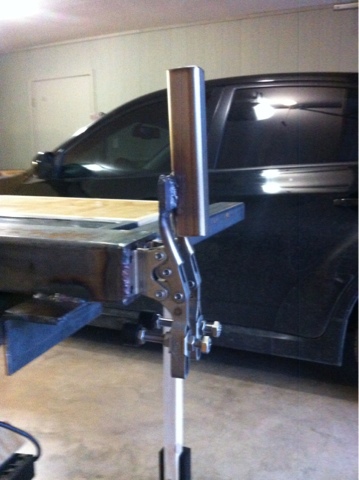
I decided to try a different clamping mechanism on my fence. I used two heavy duty hold down clamps welded to a plate and attached to the back of the fence. These clamps were free so I figured I would give them a try.


I attached the two handles together and added one handle to control both clamps.


I don't have any welding equipment at my house but I do have access to a nice Miller TIG welder at work so that is what I used to do all the welding on this project.


The clamping system seems to work very well. When clamped down the fence is very rigid.


For the end to slide on i put a small piece of 1'' x 1'' angle in the end of the fence and cut out a slot in the bottom. I then bolted a chunk of phenolic to the angle for the fence to ride on.    


The basic construction is done but there is still a lot of finishing work to do so check back soon for more on my homemade fence system. I you have any question or comments drop me an email or leave a comment.


Thanks for viewing!
If you liked what you saw consider subscribing to our blog!


Sunday, May 12, 2013

Table Saw Upgrades


Posted by
Labels: ,


This is the out feet table I made for my table saw a little while back. This has worked well for me over the past few months but what has never worked all that well was fence system on this saw. This seems to be a common problem on many lower end contractor style table saws. The current fence clamps on both sides of the table so I had to leave clearance on my out feed table for the fence to slide. I have been wanting to either buy or make a new fence for some time now. I decided since i have access to all the metal working tools i need at work, I am going to build one similar to the system John Heisz made for his homemade table saw project. Since this fence will only clamp on one side of the table i can make an out feed table that butts up to the table all the way across. I am also going to make the fence rail longer to bring my rip capacity up from 24'' to 36''.  


I am adding additional rip capacity so i decided to add a side table also. Here is what I came up with for the tables. I will do an additional post on building the fence system.


I started with some 2'' x 2'' aluminum angle that i attached to the back and side of the saw to act as a lip for the new tables to attach to. I slotted the holes to make the table adjustable so I could get it exactly flush with the table saw.


After the angle was installed with countersunk screws I made a brace from some scrap aluminum channel that I had on hand.


I cut a piece of aluminum to put on top so the wood frame would be supported by the brace.


Just temporarily installed with some regular screws.


Here is what it looked like once i put countersunk screws in everything.


Next I built a frame from 1'' x 4'' pine boards. I attached all the joints with pocket hole screws and glue.


The frame was screwed to the angle aluminum from the bottom.


Then I put plywood wrapped with pine edge banding.


The legs are just 2''x 4''s ripped in half with adjustable feet.


I made the feet out of scrap 3/4'' plywood. They are slotted and the leg has a hole drilled through it so the feet can be adjusted.


The slots extend out just like on my old out feed table.


I am really happy with how this project is turning out. This will make my table saw bigger and much more useful.


Thanks for viewing and hope you enjoyed.
Look for a post on building the fence soon!

If you like what you see consider subscribing to our blog! 


Friday, May 10, 2013

It's ALIVE!


Posted by
Labels: ,
That's right, cue the campy sci-fi music and Frankenstein style electrical effects - my table saw is back, baby.  I received the parts from Delta, and installed them nearly two weeks ago.  In the meantime, however, I had carpal tunnel surgery on my right arm so progress in the shop has been virtually nonexistent since.  I'm hoping that maybe in a couple more weeks I'll be back in the shop some.  But for now, here's a quick look at the tablesaw parts:


From right to left, we have a "seat" (Delta's term for the part), a replacement arbor nut, and the main bracket that connects the motor to the adjustment mechanisms and trunion.  The seat and the bracket broke of their own accord, and the arbor nut I damaged trying to remove it.  Somehow it got extremely tight during the breakdown, and I rounded off the corners of the old one trying to get it off.  I didn't take pictures during the reassembly; I figured they'd be hard to follow anyway.  But the important part is that I got it back together.  Here's the saw, back in working order.


I'll grant you this isn't a great tablesaw.  It's a roughly 15 year old contractor style saw, and it was probably never meant to last this long.  The fence isn't perfect, and the fact that it has a universal motor instead of an induction one makes it really loud.  But, all the same, it's tuned up pretty well and it's easily the most used tool in my shop.  I definitely want a bigger one some day, but I don't have 220 volt power in my garage and I didn't want to spend a lot of money getting it installed since I hope not to be in this shop for too much longer.  So for now, fixing this saw for only $50 was the right decision.

I hope to get back to a more regular posting schedule after a couple more weeks, but for now, bear with me.

Thursday, May 2, 2013

Completed bandsaw


Posted by
Labels: ,

Here is my completed 10 inch bandsaw. I really enjoyed this project and I am very pleased with how the saw turned out.


I put a new 1/4 inch blade on the bandsaw and it works great.


I also installed a new link belt.


Hope you enjoyed this project as much as I did. I will be getting tons of use out of this little old bandsaw! 
Thanks for viewing!
If you liked what you saw consider subscribing to our blog.