Sunday, June 30, 2013

Computer Room Organizer Shelving Unit


Posted by
Labels: , , , ,
This time I'm continuing my work on organizing our office/guitar room.  After the desk extension, I just had one disorganized area remaining in the room.  In the corner, next to the computer desk, I keep my guitar amp as well as a paper shredder.  I also have some additional guitar related cords and a microphone laying around in this area.  I decided to build a little two-tiered shelf that straddles the amp and the paper shredder.  I use a Line 6 POD x3 live with my guitar as well, and I wanted to be able to put it on the top shelf of this unit to have it closer to eye level for easy tuning while practicing.

I didn't want to spend much money on this project, so I took inventory of what I had on hand.  I had about 3/4 of a sheet of 1/4 inch plywood with a nice looking veneer layer leftover from the back of the cd cabinet, as well as some random wood of unknown species leftover from a futon frame I disassembled a while back.  I also had pine construction lumber, as usual.  With these ingredients, I decided to do something loosely inspired by the construction style John Heisz used on his Chop Saw Station a while back.  He used thin plywood, stiffened up with solid wood edging.  I did the same thing with this little shelving unit.

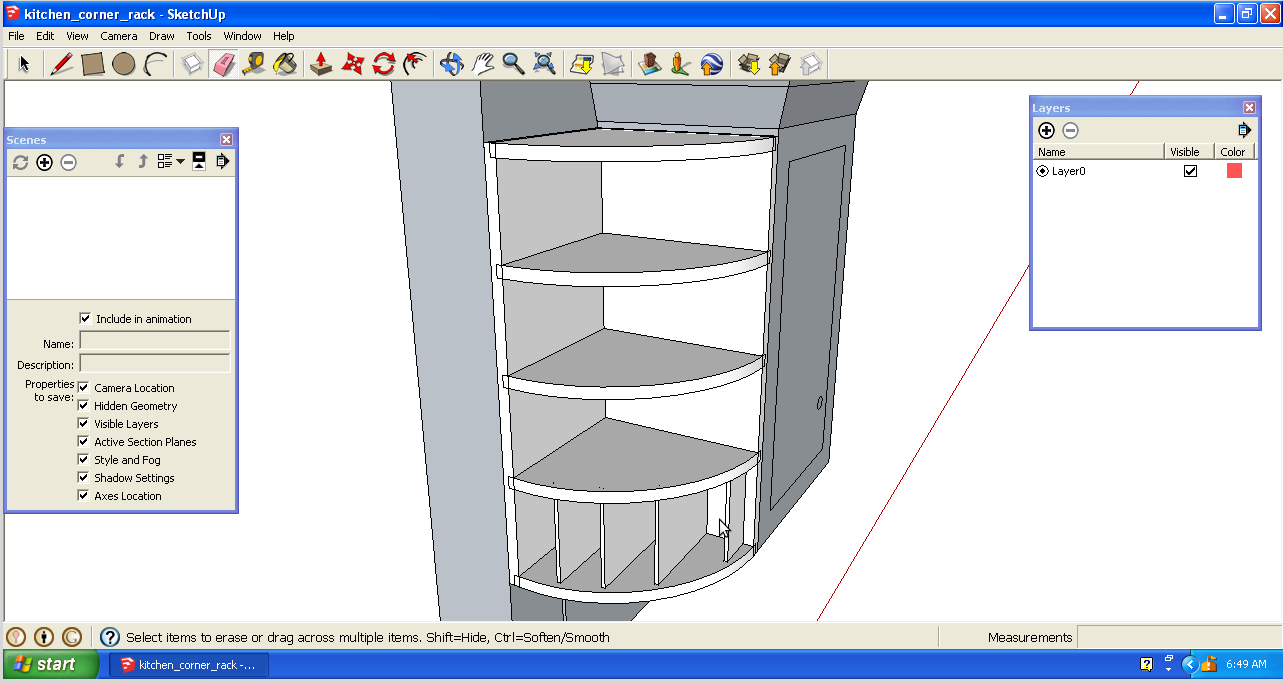
As usual, I started out by mocking this up in sketchup:
Sketchup file.

I first made up my edging.  All of it is 3/4 inch thick and 1 1/2 inches wide.  I used the leftover futon wood for the shorter pieces of edging, and the pine construction lumber for the longer pieces.  I ripped some 2x4s vertically to yield 1 piece about 7/8" thick by 3 1/2 inches wide, and another piece about 9/16" thick by 3 1/2 inches wide.  The remaining thickness is lost to the tablesaw blade. Construction lumber often needs a little jointing before this type of ripping operation, and this time was no exception.  After that, I set my saw to about 1 11/16" height (about 1/16" less than half the full thickness of the wood I'm cutting), and rip it in two passes.  This leaves the 2 halves of the board attached by a little 1/16" strip, which keeps them together and makes things a little more stable while ripping such long boards.  Then I just split them apart with a chisel driven into the edge of the little strip that connects them and plane the 7/8" thick half down to 3/4" thick.


I planed off some finish that was on the futon wood and got it down to the same thickness as the pine edging.  I cut everything down to final size, and then rabbetted all the edging to receive the plywood panels on my table saw with a dado blade.


Then I notched out all the long pieces of edging to receive the shorter pieces.


I ripped all the plywood panels to size, and assembled all the sub assemblies by gluing the edging to the plywood panels.


I should have made the rabbets in the edging to receive the back panel before I assembled all the panel and edging assemblies, but I forgot and had to make these rabbets after gluing the edging on.

Since this shelving unit is not intended to carry a heavy load on the shelves, I decided to do the final assembly with pocket hole screws and glue.  I drilled pocket holes in the ends of the shelf assemblies. 


Then I realized I needed another filler strip of the edging wood to provide a place for the pocket hole screws on the middle shelf to attach to the end assemblies.  I made some pieces out of pine, and glued them to the plywood and edging on the end assemblies.  Then I put glue on the ends of the shelves, and drove the pocket hole screws in place.  I attached the back panel with glue and some small brads with my brad nailer.  I drilled out a hole for cords to pass through the back panel before I glued this panel in place.


I finished this project with a couple of coats of Danish Oil.  I wanted something that would be relatively easy to apply, and I didn't need a lot of protection.  Plus I already had this on hand.

Here's the completed shelving unit in place.


Tuesday, June 11, 2013

Kitchen Cabinet Corner Shelves


Posted by
Labels: , , ,
I'm on a bit of a storage and organization kick these days, and this time around I'm making use of some wasted space in my kitchen.  We have a little corner of the kitchen counter that ends up just collecting junk.  We also collect junk on the kitchen table, like most folks.  Mail, in particular, frequently takes over any and all available surface space.

I actually worked this design up in sketchup some months ago, but it's just been on the back of the project queue for a while.  I chose the curved shelves to maximize the use of that corner cabinet shape, and the slots at the bottom are for mail!


Sketchup Link

Luckily, I have all the plywood on hand to do it.  I'm using the leftover "blondewood" plywood from my cd storage cabinet project.  I start out by cutting out the two back pieces.  These have dadoes for the inner shelves, rabbets for the outer shelves, and the two back pieces themselves fit together with a rabbet.  I cut all these on my tablesaw.  The rabbets I cut just using a standard blade in two passes.

As usual, this 3/4 inch thick plywood is not actually 3/4 of an inch thick, and I couldn't get a set of chip breakers and shims from my dado blade set to cut the right width for a good fit, so I cut these in two steps.  First, I cut the outer bounds of the dadoes with my standard blade using my table saw sled and a stop. 


Then I swapped out for an undersized dado blade stack and removed the remaining waste.  This whole process was kind of a pain, and I would probably try harder to make the dado stack work in one pass if I had it to do over again.


I laid out the curved shape for the shelves using a thin piece of oak.  Such a piece of wood is often used with a string, forming a "bow" for laying out curves. 


In this case, though, I dry assembled the back pieces and shelves using clamps, and then clamped on the thin oak strip to trace the curve. 


Then I rough cut the first shelf on the bandsaw, and sanded to the line on the disc sander. 


I made the other shelves by using the first shelf as a pattern.  I traced the shape of the first shelf onto each additional shelf, then rough cut it on the bandsaw.  Then I stuck a rough shelf to my pattern shelf using carpet tape, and routed the final shape with a flush trim bit at the router table.  I ended up making 2 of the shelves out of mdf that was previously painted purple because I ran out of the plywood and had the mdf on hand.  Since it will all be painted, it shouldn't be noticeable.


The bottom shelf is divided into slots by some 1/4 plywood strips.  These strips float in slots in the bottom two shelf boards.  I cut these strips out of scrap oak veneer plywood and rounded over the nose of each piece with my block plane.


I cut the slots for these dividers at the router table.  I used the fence and stop blocks.  Since the slots are cut on opposite faces of the two shelf boards, I had to move the stop blocks back and forth for each cut.  It also made every other cut a back-routing situation, so it was hard to keep the bit from wandering on these cuts.  This was time consuming, but produced good results in the end.


I put iron-on edge banding on all of the exposed plywood edges to make them easier to paint. 


I decided to fully pre-finish this project since it would be difficult, if not impossible, to get paint in those slots after assembly.  I have a love-hate relationship with pre-finishing.  I really hate all the prep (taping off glue joints), but it can produce great results.  You can see more of that mistint purple paint I used for the backs of the cabinet, just to use some more of it up.


I finished this project with white latex paint, top-coated with water based clear polyurethane, just like on the cd cabinet.  But I did put into practice a lesson I learned during that project and gave the latex paint several days to dry before I put the clear on top.  This approach worked, and I haven't seen any signs of the checking in the clear top coat that I got on the cd cabinet.  I brushed on the latex paint, and sprayed on the clear topcoat.  After all the finishing, I removed all my tape and carefully glued up the project, taking care not to mar my finish with my  clamps.  Of course I did end up with a few spots of finish that needed touching up after assembly.  The most noticeable of which was that I taped off the top instead of the bottom edge of the top shelf.  This kind of stuff happens to me every time I prefinish something, and it's a big part of the reason I hate doing it. 


So I scrape off the paint on the bottom edge of the shelf with a knife for the glue surface and paint over the gap at the top after assembly.  Ugh.


Then there's also the inevitable gaps around joints after assembly that have to be touched up with paint.


After touching up the paint, I install the cabinet with drywall screws countersunk just below the surface.


Then I fill with drywall compound and then "sand" down with a flat wood block covered by a damp washcloth.  This works great, and doesn't make a mess in the house.  Just rotate to a clean section of the rag for each screw hole.


Here is the full finished rack in place!  You can still see part of the junk pile I mentioned at the beginning of this article in the corner under the shelf.


Tuesday, June 4, 2013

Computer Desk Extension


Posted by
Labels: , , ,
We have a bedroom in our house that we use as an office/guitar room/junk storage room.  I'm going to be doing a few articles on organization and storage type projects in this room, and this time around it's focused on my computer desk.  In this room I keep my computer on a desk that is not designed to be a computer desk.  It's just a general purpose desk from before the days of computers.  Because of this, and because I am generally a hoarder and slob, my computer desk is overflowing with too much stuff.  It's just not big enough to hold both my computer equipment and all the other junk that I leave laying around on it.


I decided to build a little extension wing off the left hand side to accommodate a larger printer, and hopefully just free up some more space to hold my junk!

This extension is supported by some mortise and tenon shelf brackets.  You may recognize this design from several of my previous articles.  These are simple to build, and strong enough for any normal duty load situation.  I made these out of some scrap spruce I had lying around.  I started by laying out the shape on some scrap.


Then I cut a notch out of the top corner of the horizontal piece of the bracket because I needed the top of the horizontal piece to sit nearly flush with the top of the vertical piece.  This meant that the tenon portion of the horizontal piece needed to be shorter than the overall width of the horizontal piece.


With the notch completed, I bored a series of overlapping holes in the vertical portions of the brackets to form through-mortises.  Then I cleaned up the sides of the mortises with a file.


I rounded the ends of the tenons with a file to match the mortises.  I go back and forth on this - sometimes I round the mortise, sometimes I square the tenon.


I drilled some pocket holes to mount the table later, and glued up the brackets.


The actual table portion is also made from scrap spruce.  It's composed of 5 spruce boards of different widths glued up to make a wider panel.  I edge jointed these pieces on the jointer and then glued up the panel.


Once the panel is dry, I scrape off the excess glue.  I need to establish a straight edge on one of the end grain sides of the panel, but it's too big for my table saw sled.  So I attach a straight piece of wood temporarily with double sided tape.  This straight piece then rides against the table saw fence while I cut the opposite end grain side parallel.  Then I can run this newly cut side against the fence with the temporary piece removed to cut the original side straight.  I also cut the side grain sides down to the right width.


Once these cuts have been made, I flatten the panel with a hand plane.  It's too big to go in my planer, and honestly I enjoy using hand planes for jobs like this that aren't too big.  If you don't have any hand planes, I really recommend you buy a used Stanley no 5 off ebay.  You can pretty reliably get one for less than 50 bucks, and if you're willing to do some limited restoration work yourself, you can often find a somewhat rusty one in need of some TLC for much less.  Try to find one made before World War 2 if possible, but honestly my most used jack plane is a cheap knock-off of unknown age so you really can't go that wrong.  There is an excellent index of Stanley plane information here, for those interested.


The existing desk top has a profile routed around its edges. 


This allows the top to be nearly 3/4 of an inch thick at its core, for strength, but only appear about 1/2 inch thick at the edges to make it lighter looking.  I certainly don't have whatever custom router bit produced this really shallow ogee in some factory, so I do the best approximation I can with my tablesaw.  I wanted to replace the concave curve of the ogee with just a straight taper cut, but I didn't want to take the time to build a jig like this.  So I just stuck a spacer piece on the board to run against the fence to make the board pass by the blade at an angle.  If you are going to make this sort of thing very often at all, I'd recommend building a jig, but this worked fine for this one small project. 


The fillet of the profile is made by making a normal rip cut with the blade only extended about 1/8 of an inch.


Then I rounded over the top edge with a router bit, but I couldn't figure out a way to get the router bit to cut the bottom edge with the taper, so I just rounded it over with my block plane.  Incidentally, this is the the second plane I'd really recommend you buy.  You can find them used on ebay, or even pretty cheaply new as well.  Here's what I came up with.  It differs from the original in that the fillet is taller, and the space between the fillet and roundover is a taper instead of a concave curve.  But it's close enough for me.


I wanted to attempt to somewhat color match this extension wing with the existing desk finish, so I sanded everything down and stained it with some golden pecan stain.  The spruce always ends up looking sort of splotchy when using these oil based stains, but I just do the best I can.  The color match is really not that good, but it's better than if I hadn't stained it at all.  I sprayed on several coats of rattle-can lacquer as a topcoat, and after it cured out I mounted it to the desk with drywall screws.  I did some very out of character straighting for the last picture to show the setup at its best.